Local pickup is supported; delivery details are confirmed at checkout
Production timing will be confirmed based on artwork complexity
1. Before you begin: <p><i><strong><u>IMPORTANT</u></strong></i>: There are a few notes here that I must put out before you start this project. It is important to take note of these to help make your project easier.</p><p><strong>First</strong> and foremost, this was a project that required a lot of trial and error. I am not very good with geometric shapes and went through a lot of wood/acrylic to get the exact angles correct and figure out the connections to make this work. That being said, I did have assistance using programs online to finally figure out connection points. I don't normally do that, preferring to figure out how to connect things on my own, but for this, I did use AI to help create the connection points and figure out the exact angles needed. <br><strong>Second</strong>, there are additional materials you will need to do this project:<br>1. Adhesive: For the large lamp, you will most likely want both double sided adhesive like 3m or Dualtite in addition to superglue (thick) or woodglue. For the small lamp, you will just need superglue (thick) or woodglue. If using superglue, you will most definently want activator spray.</p><p>2. Woodfiller: I liked the solid, rounded corners that I ended up with and that was achieved by using woodfiller prior to painting the 20 sided dice. You want something that you can sand so caulk (unless you find a good sandable caulk) is not something to use. Plus woodfiller is cheaper. I do include notes on woodfiller in step 9 below.</p><p>3. Paint: Your paint color of choice for the dice. </p><p>4. Sandpaper: You will need sandpaper. Yes, you can use an electric sander on this, but you will also want loose sandpaper for fine sanding. More on that in the woodfiller step. You will want at least 120 grit and 200 grit paper.</p><p>5. Light fixture: For the large lamp, I used the Layered Acrylic DIY Lamp Hardware Kit from xTool (You can find the link for it in the Bill of Materials.) For the small lamp, I had to get an different fixture from Lowes. It was the Candelabra Base Switch Cord and its item number is 0745328. It is important to note that since the plans for the smaller lamp include the connector box for that particular lamp. If you are able to use a different light fixture in place of that one, you may not need to remove or modify the connector box to ensure that you can attach it securely to the lamp base.</p><p><strong>Third: </strong>I also want to point out that this is a material intensive project (at least for the larger lamp). I have the plans set up so you get the most out of each sheet you use. </p><p>For the larger lamp, you will need 21 pieces of 12"x12" birch/basswood from xTool. For the smaller lamp, you will need 3 pieces of 12"x12" birch/basswood from xTool. </p><p>IMPORTANT: I used the wood from xTool for this project and at one point, I accidentally cut a part from a different providers birch wood. It was a tad bit thicker which resulted in not connecting without considerable effort/pushing the pieces together hard and resulting in some slight splintering. To keep that from happening, you are more than welcome to adjust the sizes of the tab holes/tabs to accomodate the wood you have or sand your pieces to fit. (Which is what I ended up doing). I recommend using the xTool wood to cut down on time and ensure a proper fit for this project. </p><p><strong>Fourth:</strong> The large lamp has 4 canvases while the small one only has 1 canvas. The colors included are Yellow for scoring, Red for cutting, and Black, Light Blue, Dark Blue for Notes and images that are all set to ignore. On the large lamp, these notes are located on the last canvas while they are set to one side of the first canvas on the small lamp.</p><p><strong>FIFTH: </strong>Each step will be labled “Both Lamps”, “Large Lamp”, or “Small Lamp” so you know which steps apply to which lamp you are working on.</p><p> </p>
2. Cut out your parts (Both Lamps): <p>As stated above, the large lamp will require 21 sheets of 12"x12" wood while the smaller lamp requires only 3. If you decide to use acrylic for any of this, please note that the settings here are for the xTool Birch plywood and you will need to adjust your settings accordingly. </p><p>Download and cut the pieces out using the settings here. </p><p>For the small lamp, you will have:</p><ul><li>19 triangles with the number cut out (Yes there are 20 numbers but one is removed to account for the one that needs to be missing for where it sits on the base. I include all numbers so that you can choose which is not wanted.)</li><li>57 connector pieces (you may want to cut a few more since they are small and you can loose them easily.)</li><li>9 connector rings. You only need 8 but I always cut an extra of parts like this</li><li>4 base/bottom connector rings. You only need 3 but, again, I like to have extra.</li><li>6 squares at with tab cutouts along the edges. One of these will have a square cut out of the center and another will have a circle and two tab slots cut out of the center along with a scored triangle. the other 4 will have scored circles for guiding where the pips go on the finished project.</li><li>15 circles that are used for the pips. Double sided adhesive on these help.</li><li>3 connector box pieces. All three will have tabs cutout. One will have a square in the middle and the other 2 will have a tab slot cut out on one edge. You will use this connector box if you use the candalabra light I mention in step one.</li><li>1 triangle that has a hole cut out of the center. </li></ul><p>For the larger lamp, you will have everything from the smaller lamp with a couple of exceptions. </p><ul><li>You will have 21 frame triangles (triangles that have a triangle cut out of the center) This includes two extra. Due to the stress these triangles are under during assembly, you may crack one so having the extras helps. Also note that having these with double sided adhesive on one side helps during assembly. </li><li>You will NOT have the 3 connector box pieces.</li><li>There are 2 triangles with a hole cut out of the center instead of one. In addition, these triangles have the corners cut away. </li><li>If you decide to use glow in the dark acrylic in your pips like I did, then you will have 15 smaller pips and 15 rings that go around the pips instead of just fifteen pips. I do include both setups in the plans on canvas 3. Double sided adhesive helps on these, especially if you are attaching acrylic to wood. </li></ul>
3. Connectors (Both Lamps): <p>You will want to assemble the connectors and connector rings and bottom connector rings first. Each connector ring will use 5 connectors and each bottom connector ring will use 4. Remember, you only need 8 connector rings and 3 bottom connector rings. (The picture I show of my bottom connector ring attached to this step was when I was experimenting and had not finalized the exact shape of the bottom connector ring but it does show the way the connectors attach to it)</p><p>When sliding on the connectors, they fit tight and some pressure may be required to snap them in but ensure they are fully seated. The points of the connectors should all be facing in the same direction. IF the connectors are loose on the rings, use a TINY drop of glue to hold them in place until you have them attached to the triangles in the next step. </p>
4. Triangles - Frame (Large Lamp): <p>Since there is no exact orientation to the frame triangles, you can do this any way you want. I recommend attaching 5 of them to one connector. Keep in mind that the photos show me using acrylic for the frame but I set this to use birch/basswood. It ends up being cheaper and and sturdier in my opinion. </p><p>You will attache the triangle by slipping the tab of the connector on the connector ring into the tab slot at one point of the triangle. It should be very snug. Carefully add a second triangle to the next tab on the connector ring. Do this until 5 have been added and all the tabs have a triangle on it. (Masking tap can help here by holding triangle edges together.) Turn the entire piece over so that the bottom of the connector ring can be seen (photo 2). (I am using a photo of the small lamp in this step as I forgot to photo the larger one at this point.) Apply glue all around the connector ring and the points where it touches the frame piece. </p><p>Apply a connector ring where two triangles meet on the outside edge of the part you just made and have upside down. Do this all the way around. This will stabalize the 5 triangles and allow you to add the next triangles. As you add triangles, drop a bit of glue where the connectors meet the triangle edges to help hold them in place. It is especially helpful here to have activator spray and superglue to help create an instant bond. </p><p>Work your way around until you get to the last triangles. Take special note here that you will be using the bottom conenctor rings and the cut away part will be facing the opening of last triangle you place. YOU WILL NOT place a triangle frame here. The cut away part should line up with the corners of the missing frame piece. </p><p>OPTIONAL NOTE: I have to explain about the reasoning for a frame. Some people may point out that a frame is not really needed. While true, due to the size, I wanted to ensure that this was a stable and durable structure. SO…that led to me designing a frame. This is, of course, not a requirement, but a strong recommendation. You COULD bypass the frame entirely but you will have to make the frame panels your numbered panels since they include the tab holes in them. You can do that by selecting one of the frame panels and releasing the compound vector. Delete the inner triangle and then select the tab holes and the outer triangle and create a compound vector. Create copies of this one triangle so you don't have to do this multiple times. Add in the numbers from the triangles by doing the same thing, release the compound vector, copy the number, paste within a triangle with tab holes and then select the entire thing and create a compound vector. </p>
5. Triangles - Numbers (Large Lamp): <p>Pretty straight forward step here. Peel back the double sided adhesive and carefully line up each numbered triangle so that it attaches to the frames. There are a couple of notes here though:</p><ol><li>While there is a pattern to how to apply the numbers, I did not follow it. You can always look it up online if you want it to be accurate and apply them as such.</li><li>When placing the number panels, be sure to place them the right way. Dry fit them before removing the adhesive backer paper so that you can ensure they are facing in such a way as to read correctly. If you place a number down wrong, it will appear backwards and throw off the look. Not only that, the adhesive makes it hard to remove without breaking the frame.</li></ol>
6. Triangles - Numbers (Small Lamp): <p>The small lamp is just like the large lamp in that you will use the connectors to attach the triangles together except that the small lamp does not have a frame. The triangles are small enough and the entire thing is light enough as to not need the frame. Just follow the exact steps from the large lamp to connect the triangles together. <br>Again, to ensure it is properly noted: be sure to place the numbers the right way before glueing the connectors to the triangles. Unlike the large lamp where you could POSSIBLY remove the numbered triangle once laid down, once glue is on and dried, you WILL break the wood removing a triangle if it is placed upside down. This will result in a destroyed project and have to start over. </p>
7. 6 Sided Dice Base (Small Lamp): <p xmlns="http://www.w3.org/1999/xhtml" id="fromXcs">The six sided dice base on the small lamp is pretty simple in that you have to glue the tabs of each side together. Make sure the triangle scored piece is your top piece and the square with the cut out center is your bottom piece. Another thing to note about the base is the single half circle that is cut out of one of the sides edges. Be sure this is located on the bottom of the side. It is where your lamp cord will come through. DO NOT GLUE THE BOTTOM ON UNTIL AFTER YOU HAVE PAINTED AND ADDED THE LIGHT FIXTURE!!! You will need to run the cord of your light fixture through this cutout halfcircle and THEN glue the bottom on. More in step 12 about this.</p><p xmlns="http://www.w3.org/1999/xhtml" id="fromXcs">What separates this base from the larger lamp is the light connector box. This is a simple piece that will allow the spring part of the candalabra light fixture mentioned above in step 1 - #5 to be attached. </p><p xmlns="http://www.w3.org/1999/xhtml" id="fromXcs">The diagram shown in the photos above is a screen shot taken from the plans. It shows how the connector box is assembled and attached to the scored triangle piece. The key here is to glue in the tabs of the sides to the UNDERSIDE of the scored triangle piece after you attach all three of the connector box pieces together. </p><p xmlns="http://www.w3.org/1999/xhtml" id="fromXcs">Once assembled, you will then attach the single triangle with the hole in the center to the top of the base, using the scored triangle as a guideline. Glue it to the top.</p>
8. 6 Sided Dice Base (Large Lamp): <p>Again, this is pretty straightforward. Glue the tabs of each side together with the top piece being the one with the scored triangle on it. The bottom piece will have the square cut out of the center. DO NOT GLUE THE BOTTOM ON UNTIL YOU HAVE PAINTED AND ADDED THE LIGHT FIXTURE IN!! </p><p>Also note the half circle cutout on the bottom of one of the sides. This is where your cord will come out for your light fixture. More on this in step 11.</p><p>After you have assembled the four sides and top piece, take the two triangles with the corners cut off and the hole in the center and glue them one on top of the other. Once that is done, glue this to the top of the base using the scored lines as a guide. </p>
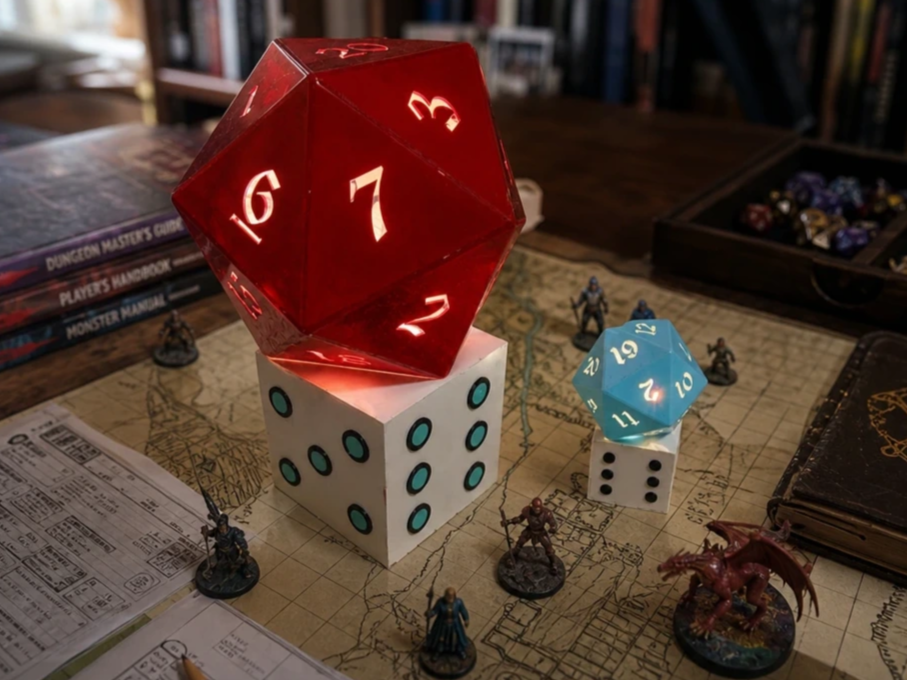
9. OPTIONAL - WOODFILLER (both Lamps): <p>I do not have any photos of the woodfiller step here as I did not think of it. I was just excited at this point that the lamp was coming together like I pictured it and got ahead of myself.</p><p>I prefer woodfiller to caulk as it sands easily and makes a wood product look good. Make sure to use a non shrink wood filler and be prepared to get messy, lol. Woodfiller dries fairly quickly but you want to give it several hours to a day to fully set. Fill in each and every crack between the triangles. Watch for woodfiller that falls into the numbers as it can catch and create a block in the number. Just push it through when that happens. Don't worry if you get woodfiller on the sides. </p><p>Something to note about woodfiller. It is very coarse when dry and can (even if it says it doesn't) shrink slightly. For this reason, be sure to overfill each area so that it is slightly higher than the holes you are filling. Also, while doing this, you can press the woodfiller into place but do not press so much that you are actually pushing it through so that it falls INSIDE the dice. If this happens, you will be constantly filling the gap. Put in just enough to fill the gap and have some outside of the gaps. </p><p>Once completely dry, it is time to sand. Probably the hardest part about this is the amount of pressure. You COULD use an electric sander but the speed and pressure of it could cause the woodfiller to chip away thus creating voides in the areas you just filled. For that reason, go slow if you use an electric sander and apply very light pressure. This will get you the best results with an electric sander. The alternative is to hand sand it. This can take a long time, but if you use a low grit paper followed by a higher grit, you will get a smooth rounded look. </p><p>If you do end up with voids, no worries, as you will see some voids no matter what once you put on your first paint coat. It always seems to happen. After your first paint coat is on and dry, go back and woodfill those voids and resand once dry and you should be good to go. </p>
10. OPTIONAL - PAINTING (Both Lamps): <p>After you have (Optionally) put in your wood filler, you can paint. I always paint my six sided base white. The 20 sided dice is painted whatever I feel like. I did red for the larger lamp and blue for the smaller one. Both have their appeal for me but this is completely up to you. </p><p>After one coat, verify there are no gaps that need woodfilling in the 20 sided dice and then sand the paint job you just did on both the base and the 20 sided to remove roughness to it. Apply a second coat to both and let dry completely. </p>
11. Adding the light fixture (Large Lamp): <p>The light fixture for the large lamp is from xTool. I also got the bulb with it. You can find this kit in the Bill of Materials attached to this project.</p><p>Remove the plastic nut from the threads of the light fixture. Stick the threaded part up through the bottom of the base and through the hole so that it sticks above the attached triangles at the top of the base. Screw the plastic nut on very tight. You can even put a drop or two of glue where the nut meets the threads to help secure it in place once you have it tightened. That is optional though. </p><p>Run the cord throught that tiny half circle cutout on the bottom of one of the sides and then attach the bottom by glueing the tabs into the proper slots. The opening under the lamp allows you to pull the cord to adjust the length a bit if you desire.</p>
12. Adding the light fixture (Small Lamp): <p>The light fixture for the small lamp is slightly different as it uses a corded candelabra base with a metal spring plate. This is found at Lowes and the part number is listed in step one under #5. </p><p>Using that exact part, you will pinch together the spring plate and stick the fixture up through the connector box placed in step 7 above and then through the hole on the top of the base. Release the spring plate so that the grooves cut in it rest in the tab cutouts of the connector box. This will put the top of the candelabra fixture right at the opening on top of the base. </p><p>As with the big lamp, run the cord through the small halfcircle cutout at the bottom of one of the sides and then attach the bottom piece of your base with glue. The cutout in the bottom allows you to pull the cord to make it shorter if needed. </p>
13. Adding the Pips (Both Lamps): <p>The pips are a step that is completely optional on the material you use. On the large lamp, I used glow in the dark acrylic pips surrounded by a border of black acrylic. Both of these were bought from xTool. On the smaller lamp, I just used straight black acrylic. </p><p>However, you can use wood circles and paint them or evne a different design altogether. What about squares or diamonds for the pips? It is up to you. I do have the pips scored on the sides to help you with even placement. Even painted, the scored lines were barely visible but provided me with a good guide on where to place the pips. </p>
14. Final Notes: <p>This was another of my dream projects. I wanted to make something like this for a long time and it finally came about. I hope that you enjoy making this as much as I enjoyed designing it. Should you come up with a different design to make it uniquely yours, feel free to remix it and share it here on Atomm. </p><p>I encourage people to design their own style and so if any step of this seems like something you don't want to do or need to do, feel free to change it to suit you. </p><p>If you liked this design and want to try one of my other ones, I have quite a few available. Most of my designs are free from Atomm and you will not find them anywhere else. I do have a few premium ones as well. Check out my link below and see what I have. And if you want to keep up on my newest projects as they go live, give me a follow, not just here but also on my FB page (Link in the bio of Atomm). <br><a href="https://www.atomm.com/@Woodlord_Crafts?utm_source=copylink&utm_medium=referral&utm_campaign=sharetoearn2&utm_id=15190">https://www.atomm.com/@Woodlord_Crafts?utm_source=copylink&utm_medium=referral&utm_campaign=sharetoearn2&utm_id=15190</a></p><p>As always,</p><p>Happy Crafting!</p>